 How
to give your rush a nose job.
How
to give your rush a nose job.Dan Bristow wanted to mount his Rush's nosecone with bonnet-style over-centre clips. This meant that the rear edges of the GRP moulding had to be modified to be flush with the front edges of the side-panels. Dan warns us that attempting to alter the width of the nosecone is difficult and can damage it badly if you don't know what you are doing and should only be done to a panel that is to be painted. Here are Dan's words and pictures:
Click on the thumbnails for larger versions.
Tips for working with glass fibre:
Tools that you will need for the job:
How
to give your rush a nose job.
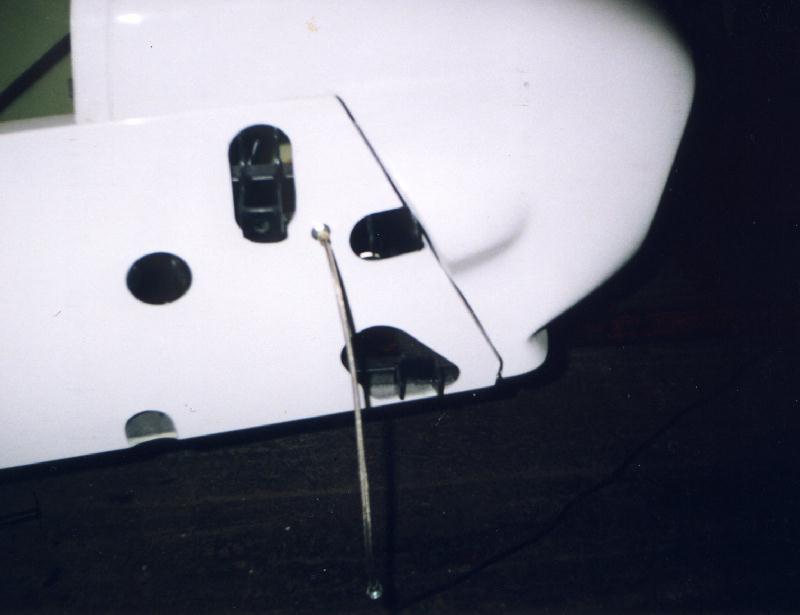
Looking at this finished picture you can see that the edge sits down neatly on the front edge of the side panel.
When you first hold the unmodified nose cone against the side panel, the rear edge will have a slight curve on
it. With a friend holding the nose cone in place, or gaffer tape, mark the bits that you will have to cut
off.  I coloured mine with a permanent marker as this is easier to see and will T-cut off. Take
little bits off at a time as you can always take some more off. Once you have a straight line you can move on to
the next step which is shown in photo number 2.
I coloured mine with a permanent marker as this is easier to see and will T-cut off. Take
little bits off at a time as you can always take some more off. Once you have a straight line you can move on to
the next step which is shown in photo number 2.
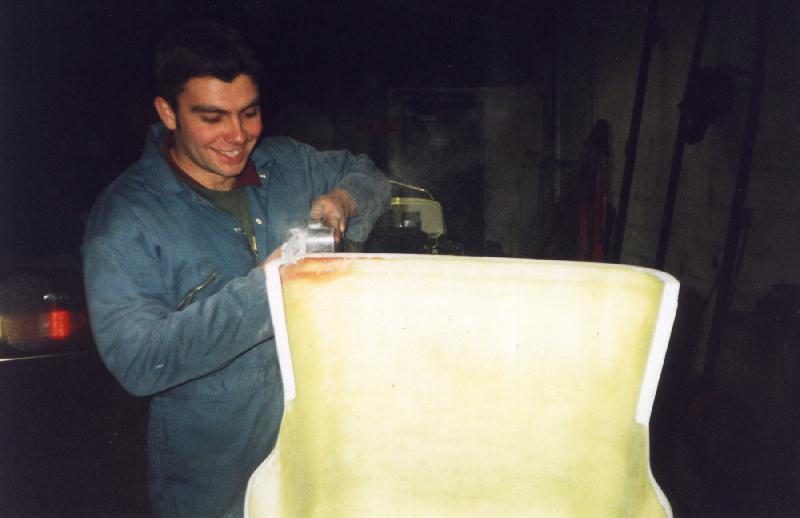
The glass fibre resin that you need should mix like normal car filler - a pea sized blob of hardener to a golf ball sized lump of glass fibre resin. Do not try to mould the resin and matting with your hands as you will end up down casualty with a nose cone stuck to you!
First thing to do is find a piece of angle. You could use a tin or a piece of wood as long as the surface is shiny. Mix up enough glass fibre to make a right angle piece about 5mm thick and long enough to do both sides. Spread it on the angled piece remembering that you only have about 3-4 mins of working time from when the glass fibre is fully mixed till when it starts to go warm and starts setting. When it starts setting, carefully prise it from the mould and let it cook for about 10 mins until cold. Cut to the length that is required to do one side trim with the angle grinder until the piece is about 1 1/2 cm wide and 2 cm deep. Mix up some glass fibre and put some on to the lower part of the nose cone as you can see in the pics. Where I put the edge is where you put some glass fibre. Stick the angled piece on to the edge with the glass fibre and hold till it sets. Now you can build up around the edge and fill it so it is not hollow. Feather the glass fibre back as this will give it strength.
 Sand
down to your satisfaction and when finished you can use some neoprene on the side panel edges to help make a snug
fit but that is your choice. Fixing the nose cone is easy. I just bought Dax's bonnet clips as they match with
the bonnet ones and are good quality. Put two on each side. Don't put one behind the headlamp as I did (see photo
3) as you don't need one there and you can't open it. The bonnet will hold it down anyway.
Sand
down to your satisfaction and when finished you can use some neoprene on the side panel edges to help make a snug
fit but that is your choice. Fixing the nose cone is easy. I just bought Dax's bonnet clips as they match with
the bonnet ones and are good quality. Put two on each side. Don't put one behind the headlamp as I did (see photo
3) as you don't need one there and you can't open it. The bonnet will hold it down anyway.
If, as with my nose cone, yours is too narrow, you can alter the top width but it is not a very easy job, it is a risky job. It worked for me and is still OK (touch wood) but there is always a chance that you will get some hairline fractures back.
 If
you look at picture 4, what we are doing is putting lots of little cuts on the edge in a sort of fan shape and
at the end of each cut you drill an 8th hole as this stops the cut from spreading. I found it only neccesary to
do this on one side of the nose cone but as before, don't attempt to do this unless you are going to spray the
nose cone.
If
you look at picture 4, what we are doing is putting lots of little cuts on the edge in a sort of fan shape and
at the end of each cut you drill an 8th hole as this stops the cut from spreading. I found it only neccesary to
do this on one side of the nose cone but as before, don't attempt to do this unless you are going to spray the
nose cone.
Put a length of wood into the nose cone to spread it to the right dimensions then mix up some glass fibre and really push it into the holes and let it set then mix up another load and build up behind the first lot. Leave over night to fully harden then cut the wood to get it out.
You can email Dan Bristow at keith@kbristow.freeserve.co.uk for more details.